
Wanted to learn how to install or refill permanent hair extensions in Lucknow, Here at Jawed Habib Lucknow we do hundreds of hair extensions installation and refiling every month. To help you out we have prepared a comprehensive guide of hair extensions installation.
Not sure what are permanent hair extensions? Check out our blog: What are permanent hair extensions?
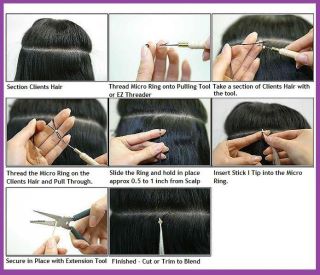
Micro Links system with the I tip hair
Prepare client's hair for installation by using a detoxifying or clarifying shampoo making sure no conditioner or any other product is used after rinsing.
Sectioning
(1) To determine where the partings will start, take a comb and place it at the top back of the head. Where the comb leaves the head is where the parting will start.
(2) Make a parting from that point to the top back of the ear.
(3) Determine where you want your first track to go. The first row is usually from the back of the middle of the ear all the way across to the back of the middle of the ear.
(4) There are many invariable in installing the strands. If the hair is thin and shorter you may want to "pack them in" the first 2-3 rows; this describes installing the extensions right next to each other across the row and section the next row right above the previous row leaving no hair out of the extensions.
(5) After establishing weight for the first 2-3 rows, you can now "brick row" the extensions; this described installing the extensions on every other piece of hair and on the next row above the row you've just installed you will install an extension above an strand there there is an empty space with no extension installed there. The effect will be like a checker board; every other strand will be installed above every other but moved over by one space.
(6) Continue up the head until you reach the top leaving enough hair at the top to cover the last row of extensions.
Now that you are finished with the back you can start work on the sides in front.
Make sure all the rows follow the curve of the head.
You will install about 3-4 rows of "packed in" extensions on the sides in front making sure you do not go all the way to the front hairline.
Start the first row in the front side just above the corner of the eye matching it up to the corner of a track coming from the back.
Load link of choice onto threader of choice
If you are using Dinkie Links with a flange end, load the link flange side down
Threader option
(1) Loop Threader-most popular and easier to use. Pre-load links onto threader. Pull a piece of hair through the loop and push the link onto the hair and insert the bonded tip of the hair extension into the link and use an installation tool to compress the link.
(2) Hook Threader, this is the latch hook method. Pre-load links onto threader. Pull a piece of hair through the hook and let the latch drop onto the hair closing the hook tip. Push the link onto the hair and install the link onto the hair strand. Insert the bonded tip of the hair extension into the link and use an installation tool to compress the link.
Sectioned off 1/4 inch strand of hair Hook Threader
(1) Slightly twist 1/4" sectioned hair so there are no renegade hairs and the strand will fit easily onto the hook of the hook threader.
(2) Slide 1/4" sectioned hair onto hook of hook threader
(3) Push up on the link which will close the little latch at the tip of the hook allowing you to slide the link onto the hair.
The hair is now installed ready for the next steps.
Loop Threader
(1) Slide 1/4" sectioned hair into the loop threader.
(2) Push up on one of the links onto the hair while pulling the Loop Threader tool in a downward motion away from the head
The hair is now installed ready for the next steps.
Link is now installed and is ready for I tipped hair extension installation
Wondering how much would it cost to have hair extensions in Lucknow check out: Hair extensions price in Lucknow
Inserting I tipped hair extension into installed link
Rest one hand on the client's head holding the sectioned off hair strand with the link now installed, with the free hand insert the pre-bonded hair strand into the link and hold with the hand resting on the client's head.
Enough hair must be sectioned off to fill the link. Once the pre-tipped hair extension is inserted into the link joining the client's natural hair, the link must be filled entirely and there should not be any gaps. If the link is not fully filled, you may experience slipping.
The link & extension have now been installed making sure that the link is not installed too close to the top of the client's natural sectioned hair strand and that the link & extension are installed straight up and down, not pulled out and away from the head. The bond of the pre-tipped extension should be fully covered by the link, the hair extension tip should not be poking out of the top or bottom. It may be necessary to trim the bond on the pre-tipped extension prior to installation.
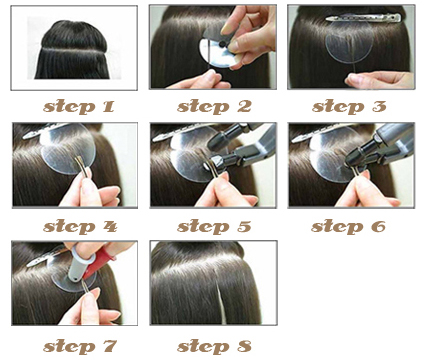
Fusions Flat Keratin Hair Extensions Hot system:
Prepare client's hair for installation by using a de-toxifying or clarifying shampoo making sure no conditioner or any other product is used aster rinsing.
Sectioning
(1) To determine where the partings will start take a comb and place it at the top back of the head. Where the comb leaves the head is where the parting will start.
(2) Make a parting from that point to the top back of the ear.
(3) Determine where you want your first track to go. The first row is usually from the back of the middle of the ear all the way across to the back of the middle of the ear.
(4) There are many invariable in installing the strands. If the hair is thin and shorter you may want to "pack them in" the first 2-3 rows; this describes installing the extensions right next to each other across the row and section the next row right above the previous row leaving no hair out of the extensions.
(5) After establishing weight for the first 2-3 rows, you can now "brick row" the extensions; this described installing the extensions on every other piece of hair and on the next row above the row you've just installed you will install an extension above an strand there there is an empty space with no extension installed there. The effect will be like a checker board; every other strand will be installed above every other but moved over by one space.
(6) Continue up the head until you reach the top leaving enough hair at the top to cover the last row of extensions.
Now that you are finished with the back you can start work on the sides in front.
Make sure all the rows follow the curve of the head.
You will install about 3-4 rows of "packed in" extensions on the sides in front making sure you do not go all the way up to the hairline.
Start the first row in the front side just above the corner of the eye matching it up to the corner of a track coming from the back.
Do you want to know if hair extensions are safe, Check our blog: Are Permanent Hair Extensions Safe?
Instilling the Flat tipped Fusion extension
Section off about 1/4 inch piece of hair and tuck it into a guard disc or scalp protetcor.
Slide 1 Flat tip hair strand under the natural hair
Slide Flat tip and natural hair into the fusion Iron and hold until sufficiently heated Roll in between fingers (finger protectors may also be used to protect fingers and so bond does not stick to skin and any oils from the skin will not affect installation)Hair extension is now installed making sure it is not installed to close to the scalp and hanging freely down from the natural growth.
Also Read: How to take good care of hair after getting permanent hair extension